
A few years ago, when we were building our house and designing our kitchen, I wrote a post on the kitchen sink decision. It is a detailed post with lots of beautiful images and over 100 helpful and interesting comments from readers. In this post, I discussed options I was thinking about for the sink itself, the location of the sink, and the style of faucet.
Many people are finding this post through google searches, and every week I receive questions about my kitchen. A lot of people must have started kitchen renovations in January, because I have received dozens of emails over the past month asking for input and guidance on kitchen decisions, whether it be countertops, cabinets, appliances, or kitchen sinks.
Lately I have been receiving quite a few emails asking what kitchen sink and faucet I selected for my kitchen, so I thought I would write a blog post on the topic.
Lately I have been receiving quite a few emails asking what kitchen sink and faucet I selected for my kitchen, so I thought I would write a blog post on the topic.
Here are the decisions that my wonderful kitchen designer Cynthia Ziegler and I made for my own kitchen, and how I feel about the decisions now that I have lived in the house for a few years.
Sink:
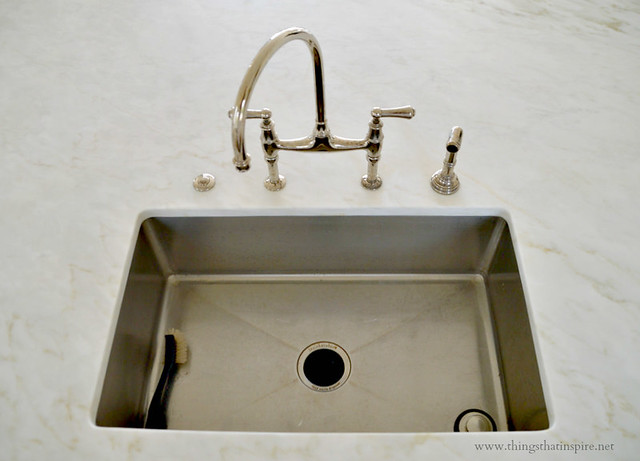
In my old house (which I did not build), I inherited a double bowl sink that had a smaller raised section above the disposal. I hated this sink, and when researching the topic of kitchen sinks, realized that I really don’t like double section sinks. I felt certain that I would prefer having a big sink with a single bowl. I have been very happy with this decision.
My kitchen designer recommended a Franke 30”x18”x9” sink because they have worked well for her on past projects. The sink is stainless steel, and I have also been happy with the material. It looks great with the style of the kitchen, and can take a real beating. If it ever gets discolored I simply wipe it with a Mr. Clean magic eraser, which is one of the most indispensible items in my cleaning closet.
We have two sinks in the kitchen, and both have the same Franke sink.
Faucet style and location of the sinks:
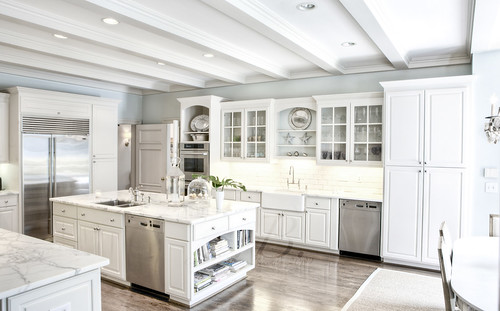
We decided to have two sinks in the kitchen that each have their own function, and selected similar but somewhat different faucets at each of the sinks based on location and space constraints.
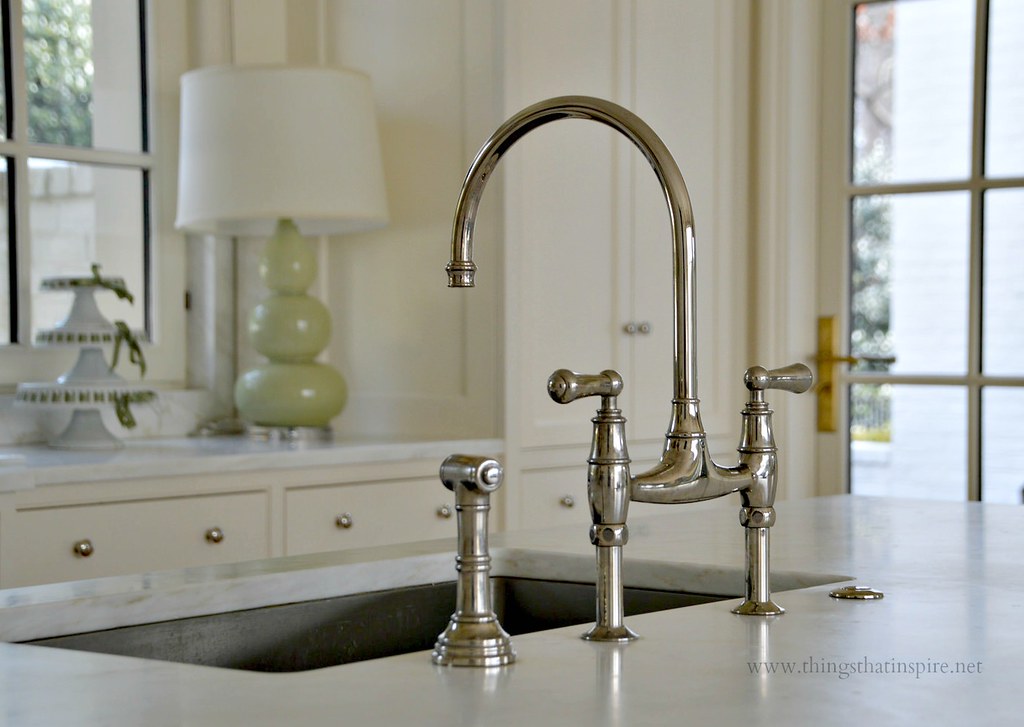
For the kitchen island sink, we used the Perrin & Rowe deck mount bridge faucet with high C spout faucet in polished nickel, with matching sidespray. My architect gave me a heads up that polished nickel gets water spots, but this has not bothered me at all and they polish right out with the Cape Cod metal polishing cloths (more about that later). We picked this faucet because it is so beautiful, and the island is so visible in the kitchen – and therefore the faucet is very visible. It’s a beautiful faucet, and quite sculptural. Note – I had not polished the faucet yet when I took this picture, so this shows two years of water spots. The polishing made it look like new!
I was worried that I would not like having a separate lever for hot and cold, and a separate sprayer. However, I quickly got used to it and I love the faucet we selected. I use the cold much of the time, and simply add a bit of hot when I want hot or warm water. I also enjoy having a lever devoted to hot water when I am filling up a pot for cooking or washing pots and pans (the island sink is where I do most of the cooking prep and clean up, as it is opposite the stove and range).
The little button to the left of the faucet is an air switch that controls the disposal, also in polished nickel.
As mentioned above, the kitchen island sink is where most of the cooking prep and clean up occurs.
As mentioned above, the kitchen island sink is where most of the cooking prep and clean up occurs.
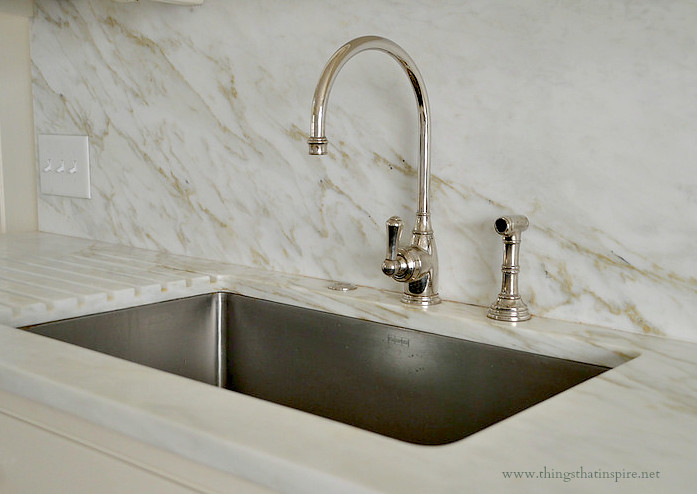
We decided to place our second sink on a wall in the kitchen. It was a bit of a design challenge but it made sense based on the kitchen layout. We used the same Franke sink as the one in the island, and a similar Perrin & Rowe faucet with a sidespray (in polished nickel), but a single hole style.
When the counter was installed, and the sink was mounted, it was time to install the faucet. We realized that we had another design dilemma – we couldn’t install the faucet as it was designed, with the single lever on the right. If we mounted this way, there would not be enough room behind the sink for the faucet handle to go all of the way back for the cold water setting – it would be prevented from moving in the full range of motion by the marble backsplash. So, we installed it with the handle in the front, allowing full range of motion side to side, and decided if it really bothered us we would find a replacement faucet. Luckily, we got used to it very quickly, although guests often can’t figure out how to use this faucet.
This second sink is used for a variety of purposes, but it was designed to be the ‘scullery’ sink – the sink where all of the dishes are cleared to and washed up after meals. My kitchen designer is very thoughtful about the processes in a kitchen and designing a kitchen so that everything has a work flow, and I have been really amazed at how beautifully our kitchen works and how it really works exactly as she had in mind from the time it was first sketched on paper.
I have also used this sink as a wine cooler/bar area during parties, filling it with ice and beverages. Note how there are drainage grooves cut into the marble to the left of the sink. I got this idea from a friend, and I love how it looks – but in reality, I tend to wash my pots and pans in my island sink, and dry them on the range.
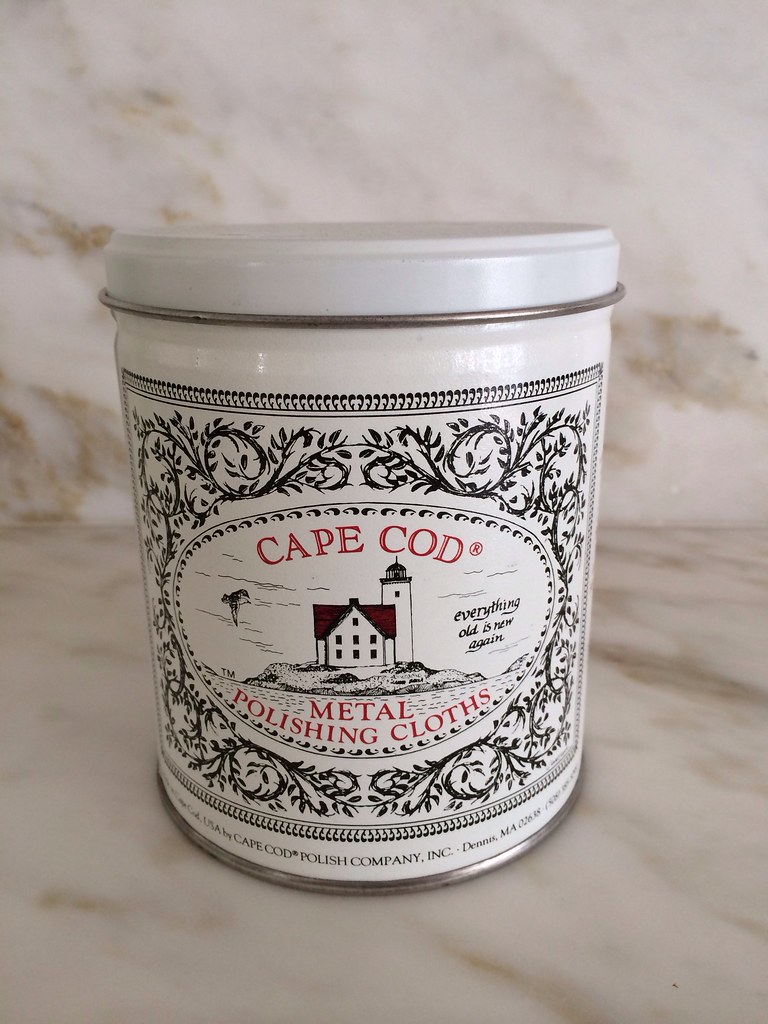
As I was writing this post, and looking at the pictures, I remembered a gift my sister gave me soon after we moved in – Cape Cod metal polishing cloths. She said that her old designer swore by them for cleaning metals – including polished nickel – and making them look brand new. I pulled them out this weekend and polished my kitchen and bathroom faucets, and sure enough they worked beautifully – they got all of the water spots off and made the polished nickel look beautiful. I highly recommend them! I think they have a gentle cleaning substance on the polishing cloths, and the process is to polish with the pink cloth then buff with the white buffing cloth.
According to the side of the can:
Polish all your fine metals without the harsh chemical smell! Achieve a fast, fabulous shine on aluminum, brass, bronze, copper, gold, nickel, pewter, silver - just about any metal - with these easy to use, reusable soft polishing cloths. Due to the exclusive anti-tarnish formula, these unique pre-moistened cleaning cloths deliver an incredible shine that lasts! That means you clean less often - and they have a pleasant vanilla scent! The beautiful re-usable tin contains 12 individually wrapped 4" x 6" polishing cloths, one buffing cloth and one pair of re-usable gloves. Also available: re-closable foil pouch with two 4" x 6" cloths.
They can be purchased on Amazon here.
I hope this post helps anyone looking into kitchen sinks and faucets. Let me know if you have any questions. Another question I get all of the time is about my marble, and what I think about marble countertops after living with them for a few years. I am working on that post!
If you would like to comment on this post, click here. I try to keep my blog positive in tone, and appreciate the same courtesy when comments are made. Thank you!
Things That Inspire favorites


Things That Inspire favorites
Things That Inspire Favorites: Cape Cod Metal Polishing Cloths
Things That Inspire Favorites: Oz Naturals Vitamin C Serum
Things That Inspire Favorites: Thera Breath Oral Rinse
To subscribe to my blog by email, click here.
To follow my blog on Facebook, click here.
Twitter: @TTIBlog
Instagram: http://instagram.com/ttiblog
Pinterest: http://pinterest.com/ttiblog/
Visit my online store, Quatrefoil Design: www.quatrefoildesign.bigcartel.com
To see design, architecture, art, and decorative books that I recommend, please visit the Things That Inspire Amazon store.


![image42_thumb[1]](https://blogger.googleusercontent.com/img/b/R29vZ2xl/AVvXsEjzNrG4aWuiyx81hfuhmNyrQ5zGClC3RmXSXoC9oS4ngUQOT81iWZRrrzs5Kgd4xmUJGqxE8pJQYiE3ZDXJfuAjvSfC0P0uNa8GXegiNQnvix2UKZi9gb6V7B2qWFVd8cAXamq6R7YfCno/s1600-h/image42_thumb11.png "image42_thumb[1]")
![image45_thumb[1]](https://blogger.googleusercontent.com/img/b/R29vZ2xl/AVvXsEi2KCShLjKYG9O31LsfC9Az1wIf5v4TUtLYgE2clEaCEJivILB2tzNAoq7zDkjuApMVJqYigaqL6MJE45MdJEIVfH0lIt-tQXvzmVSJqVXqReY-acctsV1Oj85XidSGnvLjA_MIOoH08vg/s1600-h/image45_thumb11.png "image45_thumb[1]")

![The%2BQuatrefoil%2B-%2BDavid%2BDuncan%2BLivingston%2B2[1]](https://blogger.googleusercontent.com/img/b/R29vZ2xl/AVvXsEgdQPebH7vvImI2d5LQc0FbbLfk8Imbwn3aoFCZ6ni6MUCBIlCnZ7feiu6-QetUtNQfGs5c9E_zExjpp2H5MFsigwAR4eMY8qjtqNNaGK6QG8JGfdCjRoB5AWCr-C3lo-hxPBuc0teOUzM/s1600-h/The+Quatrefoil+-+David+Duncan+Livingston+2%5B1%5D%5B3%5D.jpg "The%2BQuatrefoil%2B-%2BDavid%2BDuncan%2BLivingston%2B2[1]")
![bh03a[1]](https://blogger.googleusercontent.com/img/b/R29vZ2xl/AVvXsEjeGjMfWuIm-OTgRVzYvBopfpR4VnyBOHA9zlrs8bGxvxJQedU2tKJGjphaYkaU59T5DljixNBiyn3efRUtQpOWyDN9Wuz3nap6HvZqb7Y1ckhXYkJ23Gi_BnvR5VbqmfQr05K0TstEDUs/s1600-h/bh03a11.png "bh03a[1]")
![4528247475_6e967f0fd6_o[1]](https://blogger.googleusercontent.com/img/b/R29vZ2xl/AVvXsEj8Qi6RTTU0BCL5E4LoUXYg2Z5z3bQjI1HNFFT6_lYlV8ZTpBjnZliFY2-hxsfmXH-inpIhYnuUR_0wkTmiRHewWIYBMlL_MzKGFTPbjbWYJ1f_3obRWdBmWdi1ezwKHbAC8s5Ggm-X3kM/s1600-h/4528247475_6e967f0fd6_o%5B1%5D%5B1%5D.png "4528247475_6e967f0fd6_o[1]")
![2407691310_af747e47ea_o[1]](https://blogger.googleusercontent.com/img/b/R29vZ2xl/AVvXsEjGBiWDgY7wYcnhSkNJ3ZgbIddz_LRnow__4zgvf9eKTC7TmrMYBKgr9_nzHMqLkoiCLwlGuc3L47hvkZQ5Z5wRgU9Pj74EkrjQ6ACBUpitsQLBwBLRcmaCXiAHtJn_CzrqrEE0YhCqSrg/s1600-h/2407691310_af747e47ea_o1.jpg "2407691310_af747e47ea_o[1]")
![image_thumb1111[1]](https://blogger.googleusercontent.com/img/b/R29vZ2xl/AVvXsEjhuICGxHO-cy3YWpXhdD-jcj8xlZdPPm_2u2ykDcxKPis-8CmdEyw-4rXmC0-HC6Czdqh4YDBE2x6b405r-WQFunMxq2_83RDseajdEd0K_UTMSDupjFQUzrXscXoEXVwVuWJWxTR4qUQ/s1600-h/image_thumb1111%5B1%5D%5B1%5D.png "image_thumb1111[1]")
![HomesRooms-BraysIsland-10-lg[1]](https://blogger.googleusercontent.com/img/b/R29vZ2xl/AVvXsEhaXgTMVZFwCCGIzIQ_7stVBX_vftAefvmx4e0fk1Sx3IXEEcULB2pD8JOwYL5P29d89Odx8ZY-3hOfLYtnpz0-U4wQ1_0bxC9VzBv5S7MKaPxYArtjS59z1SXdhSEaMgAdqgeEQ3ZPuhI/s1600-h/HomesRoomsBraysIsland10lg1.jpg "HomesRooms-BraysIsland-10-lg[1]")
![2407693134_c98385e617_o[2]](https://blogger.googleusercontent.com/img/b/R29vZ2xl/AVvXsEgRfVuDATKZXWjN0k2ZqTz1tVuMvZOYGvUwiUnok6YZxyEootbOXqhZX8nSqbuD0PU5NU8QF_hVA7QaIE7BxH-WDjNH8GZyflQYJ14bR7efnkjc-Mum3ASGPYYudpOd6xeFvAy4lEKbFvY/s1600-h/2407693134_c98385e617_o22.jpg "2407693134_c98385e617_o[2]")
![2406860335_17ef512fd3_o[1]](https://blogger.googleusercontent.com/img/b/R29vZ2xl/AVvXsEg2tHoDhe6Z_Xkh_JJgvaxhWATKaqKLvEX7qKU0C_UnH1H-DVJxu4EqQOK2i6Xgp3CJvNYRFTj_1-fCbHWX0xdkYU0C-VnvPmGqAkX0NlMu8EC8wQhycrrzUoL5PPJDzdGrXkSRtATVYW8/s1600-h/2406860335_17ef512fd3_o1.jpg "2406860335_17ef512fd3_o[1]")
![4558384205_f2c0c60c07_o[1]](https://blogger.googleusercontent.com/img/b/R29vZ2xl/AVvXsEjx-ZopfLGfUglw76YICtAvoi6TUZ0OOP-xhBClLei9gbhJscpZM9ZNAS3vNzMMB06KZDBhVvDRb4vtckI7e8Ms7HjvTxuZTgY45w6awQHmp_ZNJd6Ky3T35jQ-AHZBoXmnm4pheXdGK4s/s1600-h/4558384205_f2c0c60c07_o%5B1%5D%5B3%5D.jpg "4558384205_f2c0c60c07_o[1]")
![2408239762_5fd512cd26_o[1]](https://blogger.googleusercontent.com/img/b/R29vZ2xl/AVvXsEhHdCZLcxIhJT7wAvJl4EaDs8axfk3gFC3DxzJXMEbT0g-HxbFDf3AJzQCKr2IBL3EtU89gBMUYC9Fo6E5jRkfiyd377oQSMxshGJC_tF_sUJsL5wkHzhFmeQ0QfaLZtFF4fAohoJEMTD0/s1600-h/2408239762_5fd512cd26_o%5B1%5D.jpg "2408239762_5fd512cd26_o[1]")
![2650869902_ecc9ffe6f3_o[1]](https://blogger.googleusercontent.com/img/b/R29vZ2xl/AVvXsEgAGkg6-J8Yran-ImKGrJ8HcOZSGnVKXGc9RouT55M9zicNRpSXB0lAWn_DGc6LKbj0uYOCxKUdarKABiXpCL8DxdL2IjMgtCvX5B_Yc1RA0Utbi6ypy5NuYYxjBUydFnjvSopZscjAirg/s1600-h/2650869902_ecc9ffe6f3_o%5B1%5D.jpg "2650869902_ecc9ffe6f3_o[1]")














.jpg)


